前回までで carbikeのindex画面とpredict画面を生成しました。
今回はhtmlを記述していってwebサイトをかっこよくしていきます。
Contents
django-bootstrap4 をインストール
django-bootstrap4を使いますので、
> pip install django-bootstrap4をします。
django-bootstrap4-1.0.1 が入りました。
htmlファイルの作成
/myproject/car_motorbike/ の下に
- /templates/carbike/base.html
- /templates/carbike/index.html
- /templates/carbike/predict.html
というファイルを3つ作成します。
まずはじめに各ページ共通の部分である雛形としてbase.htmlを作成します。
index.htmlとpredict.htmlには各ページ固有の内容を記述して、雛形であるbase.htmlに埋め込んでいくやり方を取ります。
base.html の作成
各ページ共通の部分である雛形です。
|
1 2 3 4 5 6 7 8 9 10 11 12 13 14 15 16 17 18 19 20 21 22 23 24 25 26 27 28 29 30 31 32 33 34 35 36 37 38 39 |
<!DOCTYPE html> <!-- この base.html はテンプレートファイルとして作成され、各ページに流用されます。 --> <html lang="ja"> <head> <meta charset="UTF-8"> <!-- static/carbike/css/style.cssを参照できるようにディレクトリを指定する--> {% load static %} <!-- django-bootstrap4 と bootstrap_cssを使用する宣言--> {% load bootstrap4 %} {% bootstrap_css%} <!-- ディレクトリstaticの下のcarbike/css/style.cssを読み込む --> <link rel='stylesheet' type="text/css" href="{% static 'carbike/css/style.css' %}"> <!-- bootstarap_javascript の jquery を読み込む --> {% bootstrap_javascript jquery='full' %} <!-- 各ページ固有のタイトル title を代入する部分 --> <title>Image classification by TensorFlow | {% block title %}{% endblock %}</title> </head> <body> <!-- ナビゲーションバーを設置する --> <nav class="navbar navbar-expand-lg navbar-light bg-light"> <a class="navber-brand" href="#">Image classification by TensorFlow</a> </nav> <!-- メインの内容を設置する --> <div class="container"> <!-- 各ページの内容 content を代入する部分 --> {% block content%}{% endblock %} </div> </body> </html> |
bootstrap4の記法は下記のようにDTL: Django Template Languageで
{% xxxxxxx %} と書きます。
1.タイトル
{% block title %}{% endblock %} の部分にindex.html,およびpredict.html各ページ固有のタイトルが代入されます。
2.内容
{% block content%}{% endblock %} の部分にindex.html,およびpredict.html各ページ固有の内容が代入されます。
cssファイルの作成
上記、base.htmlの中で、スタイルシートの宣言をしていますが、自分でディレクトリとファイルを作成する必要があります。
<link rel=’stylesheet’ type=”text/css” href=”{% static ‘carbike/css/style.css’ %}”>
staticディレクトリを myproject/car_motorbike/直下(templatesと同階層に作成して、その中に/carbike/css/style.css というcssファイルを作成しておきます。
あとで記述していきますので、現時点では空ファイルでOKです。
index.html の作成
indexベージを作成します。
|
1 2 3 4 5 6 7 8 9 10 11 12 13 14 15 16 17 18 19 20 21 22 23 24 25 26 27 28 29 30 31 32 33 34 35 36 37 38 39 40 41 42 43 44 45 46 47 |
<!-- インデックスページを作成します。--> <!-- テンプレートであるbase.htmlに対して 拡張する宣言をします。--> {% extends 'carbike/base.html' %} <!-- タイトル title をbase.htmlに埋め込みます。--> {% block title %}車とバイクの画像をTensorFlowで判別するdjangoアプリ{% endblock %} <!-- 内容 content をbase.htmlに埋め込みます。--> {% block content %} <div> <!-- classはbootstrap記法で文字間の調整になる mtマージントップ mb マージンボトム 境界線底部 --> <h4 class="mt-4 mb-5 border-bottom">車とバイクを判別します。</h4> <p>画像ファイルを選択して ボタンをクリックしてください。</p> <!-- ファイルの投稿フォームを作成 実行したときのページ移動先の指定 ファイル送付方式 クラス名定義 エンコードタイプ指定--> <form action="{% url 'carbike:predict' %}" method="post" class="form" enctype="multipart/form-data"> <!-- サーフ対策:外部プログラムからデータを送りつけられないようにする--> <!-- cross site request forgery 対策--> {% csrf_token %} <!-- データのアップロードフォームを作成する --> <div class="form-group"> <div class="custom-file"> <!-- 二重括弧の意味 ==> djandoの変数を参照する--> <!-- form.image ==>views.pyから送られてくる imageの値を取得してformに埋め込む--> {{ form.image }} <label class="custom-file-label" for="customFile"> ここをクリックしてください。 </label> </div> </div> <!-- submitボタンを設置する --> <button type="submit" class="btn btn-primaty">提出</button> </form> </div> {% endblock %} |
1.埋め込み先の宣言
雛形ページであるbase.htmlに対してタイトルと拡張宣言をします。
{% extends ‘carbike/base.html’ %}
2.埋め込むタイトルを定義
{% block title %}xxxx{% endblock %}
3.埋め込む内容を定義
{% block content %}xxxx{% endblock %}
forms.py を作成する
myproject/car_motorbike/の下に forms.pyを新規作成します。
|
1 2 3 4 5 6 |
# フォームを生成するモジュール from django import forms class PhotoForm(forms.Form): # 画像をアップロードする機能 image = forms.ImageField(widget=forms.FileInput(attrs={'class':'custom-file-input'})) |
views.py へforms.pyを埋め込む
indexページの表示内容であるindex関数の部分を hello worldをreturnするだけの状態から、formを表示する内容に変更します。
|
1 2 3 4 5 6 7 8 9 10 11 12 13 14 15 16 17 18 19 20 21 22 23 24 25 26 27 28 29 30 31 32 33 34 35 36 37 |
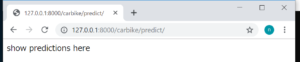
from django.shortcuts import render # Httpレスポンスをするためのモジュール from django.http import HttpResponse # テンプレートファイルを読み込む from django.template import loader #追加 # forms.pyで定義したPhotoFormクラスを呼び出す from .forms import PhotoForm #追加 # models.pyで定義したPhotoクラスを呼び出す # まだ作っていないので保留 # from .models import Photo #追加 def index(request): # webサイトのindex.html に相当する部分 # 構造がとても複雑だが、こういうものだと諦めること。 # 引数としてrequestを受け取る # index.htmlを読み込み # オブジェクトtemplateを定義する template = loader.get_template('carbike/index.html') #追加 # forms.pyのクラスPhotoFormのインスタンスを作成して、 # ディクショナリcontextを定義しておく。 context = {'form':PhotoForm()} # オブジェクトtemplateのrender関数に # フォームcontextと引数requestを入れて # HttpResponseを返す return HttpResponse(template.render(context, request)) def predict(request): # 仮のリターンを作っておく return HttpResponse('show predictions here') |
やっていることは3つのみ
1.テンプレートオブジェクトを定義
template = loader.get_template(‘carbike/index.html’)
2.コンテキストオブジェクトを定義
context = {‘form’:PhotoForm()}
3.HttpResponseをreturnする
return HttpResponse(template.render(context, request))
apps.pyを確認する
現在このアプリケーションが認識されているアプリ名を確認します。
CarMotorbikeConfigクラスの中に name = ‘car_motorbike’ と定義されています。
|
1 2 3 4 5 |
from django.apps import AppConfig class CarMotorbikeConfig(AppConfig): name = 'car_motorbike' |
これを 後述のsettings.pyのINSTALLED_APPSリストに追加します。
myproject/settings.py を編集する
リストINSTALLED_APPS にクラス名’car_mortorbike.apps.CarbikeConfig’と ‘bootstrap4’を追記します。
|
1 2 3 4 5 6 7 8 9 10 11 12 |
# Application definition INSTALLED_APPS = [ 'car_motorbike.apps.CarMotorbikeConfig', 'django.contrib.admin', 'django.contrib.auth', 'django.contrib.contenttypes', 'django.contrib.sessions', 'django.contrib.messages', 'django.contrib.staticfiles', 'bootstrap4', ] |
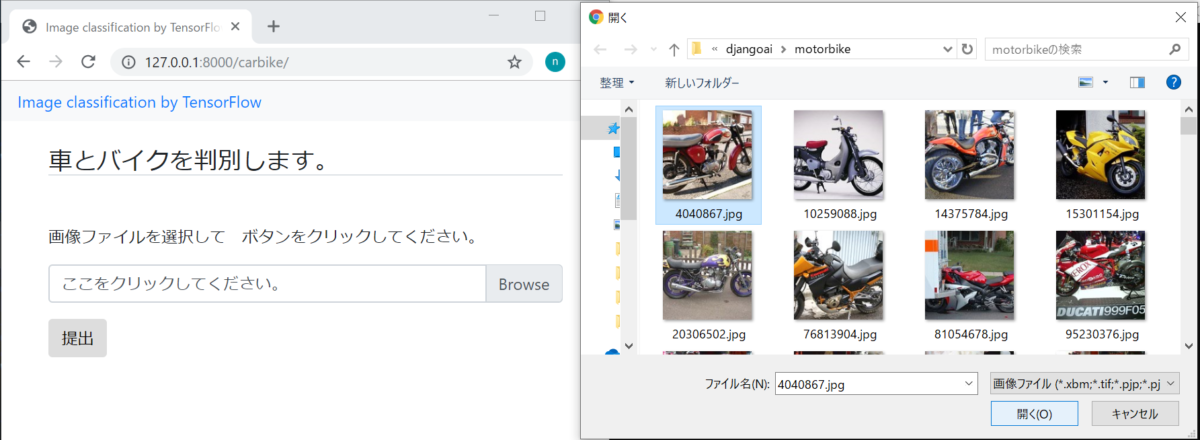
ではここまでをブラウズしてみます。
仮想環境へ conda activate djangoai
開発サーバーへ python manage.py runserver
url http://127.0.0.1:8000/carbike
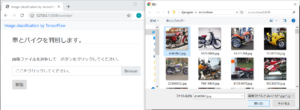
ここで、画像を選択肢画提出ボタンを押すと、ページが遷移します。
ここはまだ作り込んでいないので、これでOKです。
次回
以上、次回は第11回目です。
django 複雑ですねえ。これは習得するのに時間がかかる・・・。(´・ω・`)
Keita N
最新記事 by Keita N (全て見る)
- 2024/1/13 ビットコインETFの取引開始:新たな時代の幕開け - 2024年1月13日
- 2024/1/5 日本ビジネスにおける変革の必要性とその方向性 - 2024年1月6日
- 2024/1/3 アメリカ債権ETFの見通しと最新動向 - 2024年1月3日